Raspberry Pi configuration

Guide to the correct configuration of the Raspberry Pi to be controlled with the RaspController application via SSH

Start your Raspberry Pi with the Raspbian OS. (Important: only Raspbian is fully supported, therefore it does not ensure correct operation with RaspController using other operating systems).

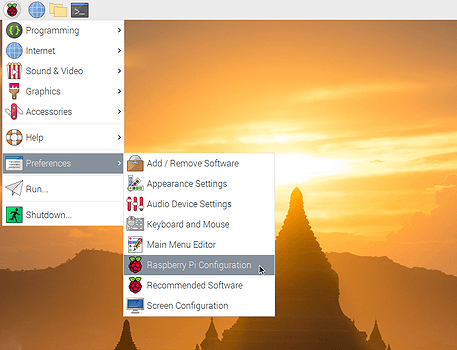
Click on the main menu, select “Preferences” and then “Raspberry Pi Configuration”.

Alternatively, you can use the command raspi-config from the terminal.


If you are using another distribution you can install SSH by typing in the terminal:
sudo apt update
sudo apt install openssh-server
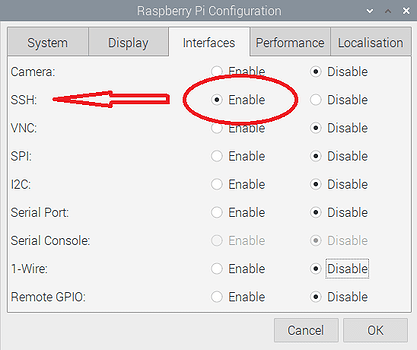
Enable SSH

From the Raspberry configuration window select the “Interfaces” tab and enable SSH.
RaspController will use SSH to connect with the Raspberry Pi.


Finally press the “Ok” button and restart your Raspberry Pi.

IP address

To know the IP address of your Raspberry Pi, type ifconfig from the terminal.
In this case the IP address is: 192.168.1.20
If the ifconfig command is not available you can use the command:  ip addr


It is recommended to set a static IP address, otherwise when the IP address changes it will no longer be possible to reach the device.

Add device to RaspController

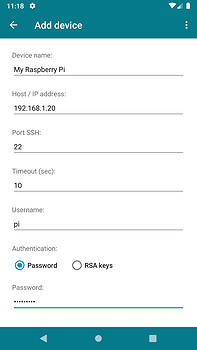
Finally open the RaspController app and create a new device using the IP address of the Raspberry PI, username and password.
If not changed, the default SSH port is 22.

If you want to use an SSH key follow this guide: SSH Key authentication


Now you can control your Raspberry Pi from the RaspController app.


You can use RaspController over the internet ie outside of the home Wi-Fi, remember to use a static public IP (or a DynDns service) and configure the appropriate Port Forwarding on your router.